解決例: OneNoteで(バックスラッシュ)入力時に¥(円)記号に変換される事象
· One min read

VSCode (on macOS) でGitHub Actionsを利用する為、リポジトリに.github/workflows/*.ymlファイルをpushする際に下記のエラーが発生しpushできない事象が発生。
! [remote rejected] main -> main (refusing to allow an OAuth App to create or update workflow `.github/workflows/xxx.yml` without `workflow` scope)
OAuth上でworkflowに対するcreate or updateの権限が付与されていない為。workflow機能の実装以前にVSCodeでGitHub関連のOAuth設定をしていた場合は本事象が発生する可能性あり。
VSCode上でGitHubアカウントからサインアウトしアプリを終了(⌘Q)。
「キーチェーンアクセス.app」上の検索ボックスで文字列github.comとvscodeに合致する全てのエントリを削除。
VSCode上でGitHubアカウントに再サインイン。サインイン時に権限付与対象の設定チェックボックスが表示される為、workflowがチェックされていることを確認。
サインアウト前に設定確認した限りだとworkflowへの権限チェックはついていたものの、本事象が発生していたのがイマイチだった。(readはOK、create or updateはNGの意味だったのかな。。)
なぜならSafePalのderivation pathが m/44'/501'/0' でありsollet.ioはderivation pathの選択ができる為。そして同じ理由でLedger Nano Xでの復元は不可。derivation pathが m/44'/501'/0' でない為。
先日SafePalのV1.0.30でSolana チェーンのサポートが発表。Ledger Nano X / SafePal S1 / ペーパウォレットユーザーとしてはバックアップ先が増える話は歓迎の為、早速復元できるか確認したもの。
Upgrade Your SafePal S1 To On-board New Features
V1.0.30 (08/20/2021 mm/dd/yyyy) 1. Supports Solana mainnet, SPL tokens and DApps
2021/09/01時点ではSolana (SOL)の記載なし。
The derivation path of the address of the currency already supported by SafePal. – SafePal
SafePalのニーモニックフレーズをSollet.ioでリストアし、作成したSPL token アドレスと合致するderivation pathオプションを特定。
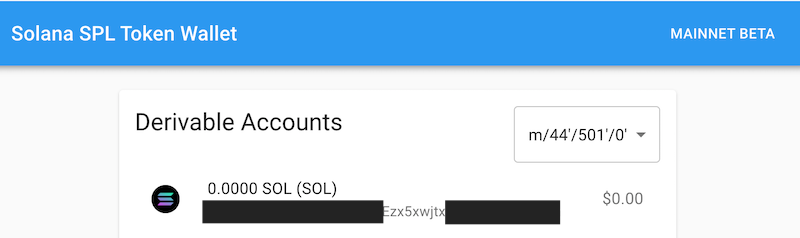
Sollet.ioのニーモニックフレーズ(シードフレーズ)のインポート後のDerivable Accountsオプション画面
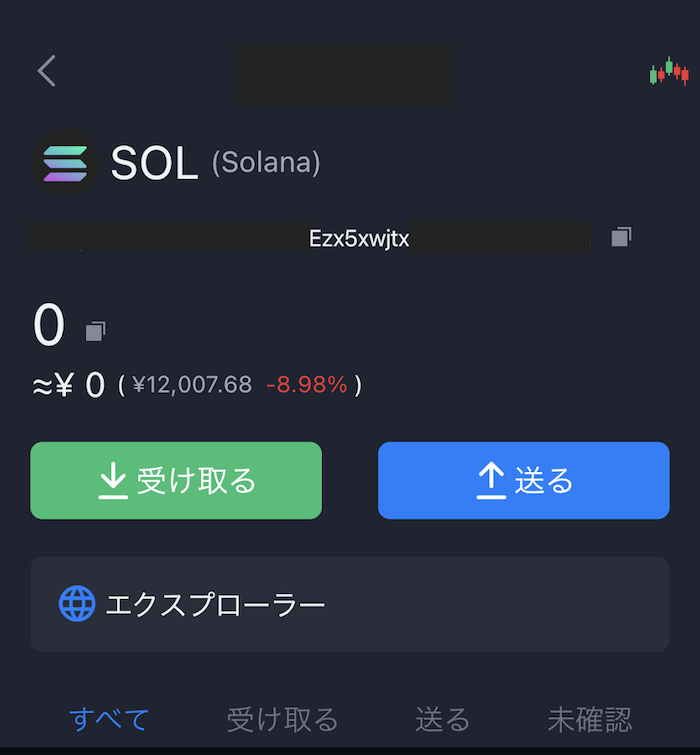
SafePal Wallet (iPhoneアプリ)のSPL tokenアドレス画面
上の二つの画像に記載のアドレス(一部グレーアウト)が一致していることを確認できる。
因みに、記事投稿時点ではSafePalはRaydiumに対応。今後Phantomがスマホ対応を予定するがハードウェアウォレット+スマホでDappを操作したいニーズがある場合はSafePalは良い選択肢になるだろう。因みにLedger Nano Xの場合はスマホでSolana のDapp操作は不可で、デスクトップPCにUSB-C接続して使用する。
以下にハードウェアウォレットのアフィリエイトリンクを置いておくので良ければ活用下さい。割引特典あり。
Ledger Nano XとSafePal S1を入手し表題を実機検証できたので備忘で記載するもの。
これまた前回の記事と同様に表題について実機確認できた為まとめておくもの。
2021年3月23日(火)にDeFi プラットフォームのDonnie FinanceがiwBTC (IOST Wrapped BTC)のステーキング(staking)によるDON の配布サービスを開始。本記事ではiwBTC定義、入金(Deposit)フロー、想定リスクについて公開情報を元に簡単にまとめておくもの。
https://twitter.com/donniefinance/status/1373854156788621316?s=21
Donnie Finance発行のWBTC (ERC20規格)にbackedするIRC規格のトークン。間接的にBitcoin (BTC)の価値をIOSTチェーン上で取り扱うためのもの。トークンのコントラクトアドレスは以下の通り。
作成アカウントはdonmanagerとDONトークンの発行元アカウントと同じ。
ステーキングページ( https://donnie.finance/trade/iwbtc ) 上のWBTC SwapメニューよりiwBTCへ変換を行うためのWBTC用Depositアドレスが提供される。昨日試しに表示されたアドレスをEtherscanで確認したが、0残高ということで、サイトに記載の通りユーザー個々に生成されるアドレスと思われる。
BTC, WBTC, iwBTCの関係性を踏まえたフロー図は以下の通り。
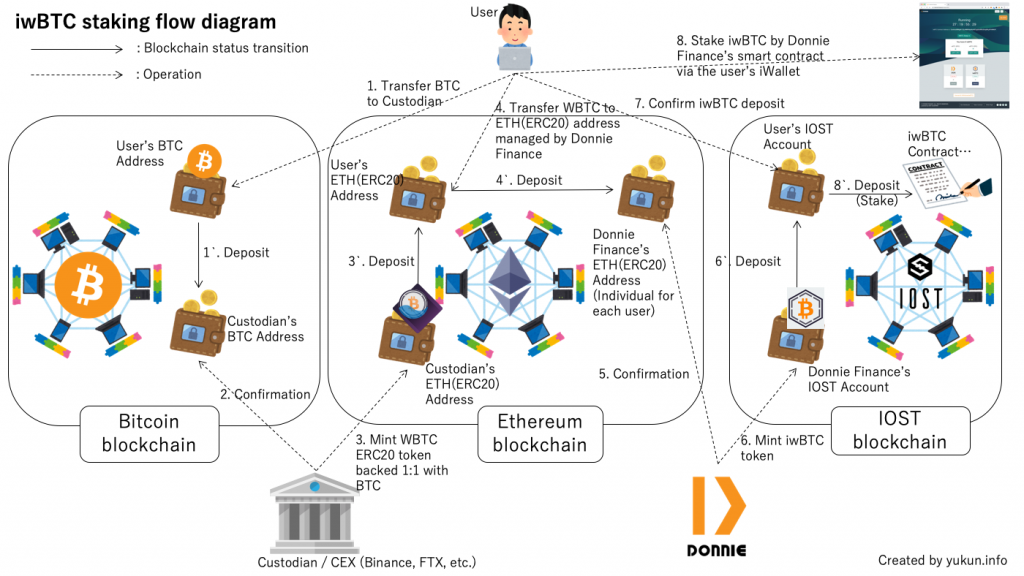
No.1〜3:WBTCを保有していない場合はBTCをカストディアン経由で入手、と図中はかしこまった表現をしているが、言い換えればBTCをBinance, FTX等のWBTC取り扱い取引所に送金してBTC→WBTCトレードをする。WBTCの公式上の定義は"Wrapped Bitcoin (WBTC) is the first ERC20 token backed 1:1 with Bitcoin"だが、取引所上は需給バランスによっては0.0X%程度の変動はある。
No.4〜4`:取引所経由でWBTCを入手した場合はNo.3`をスキップして直接No.4, 4`を実施する。送金先のアドレスはDonnie Finance上で表示されているETH (ERC20)アドレスとなる。
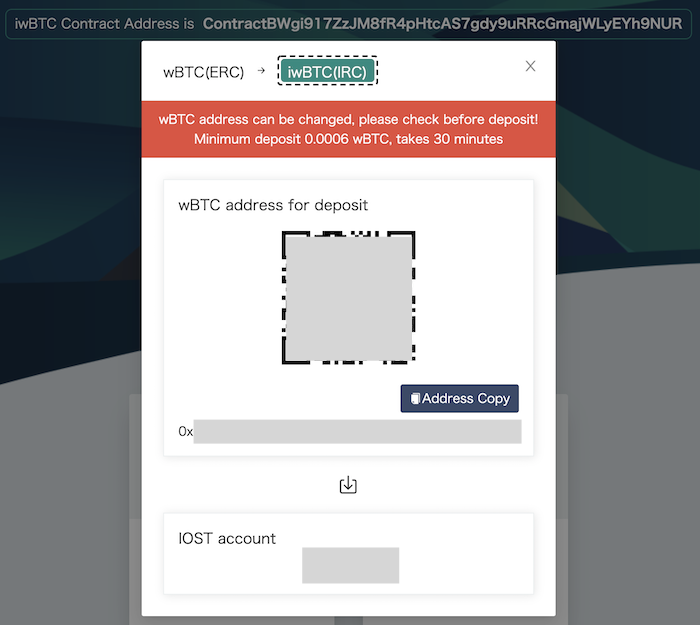
BTC Swap画面例。最低入金額は0.0006 wBTC、入金確認には約30分
一般的なDeFi・スマートコントラクトのリスク(※)の他に考えられるものを2点ほど挙げておく。
※参考サイト
現状IOSTのスマートコントラクトにクロスチェーンスワップを実装できるような機能は無いので(将来的にはPolkadot等とクロッシングしてくと思われる)、ETHアドレスへのDeposit経由という力技で対応している。Donnie Finance社側もクローラ等である程度自動化はしているだろうが。WBTCやERC20規格等この辺りの理解が無いユーザーはBTCを直にETHアドレスへ送金するミスを冒す可能性がある。
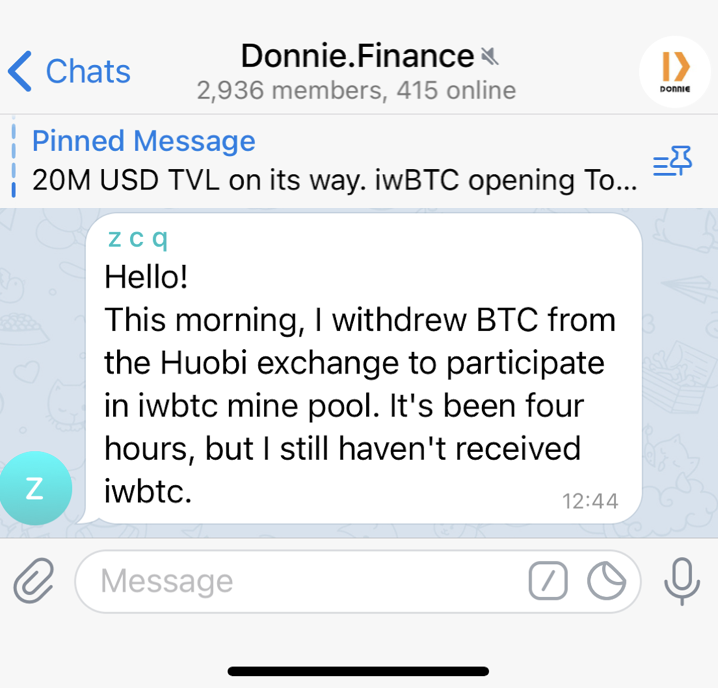
公式Telegramでのユーザーの照会を抜粋
上記のケースがBTCからの送金にETHアドレスを指定していたのであれば、当然チェーン越えは出来ないので対象BTCは消失扱いとなる。合掌。。。未来の量子コンピュータによる計算か超大なレインボーテーブルに運良くETH(ERC20)アドレス文字列に該当するBTCプライベート鍵[秘密鍵]文字列がわかれば動かせるかもと思いつつ、改めて考えるとBTCとETHのアドレス書式の違いもあり、無理だろう。。
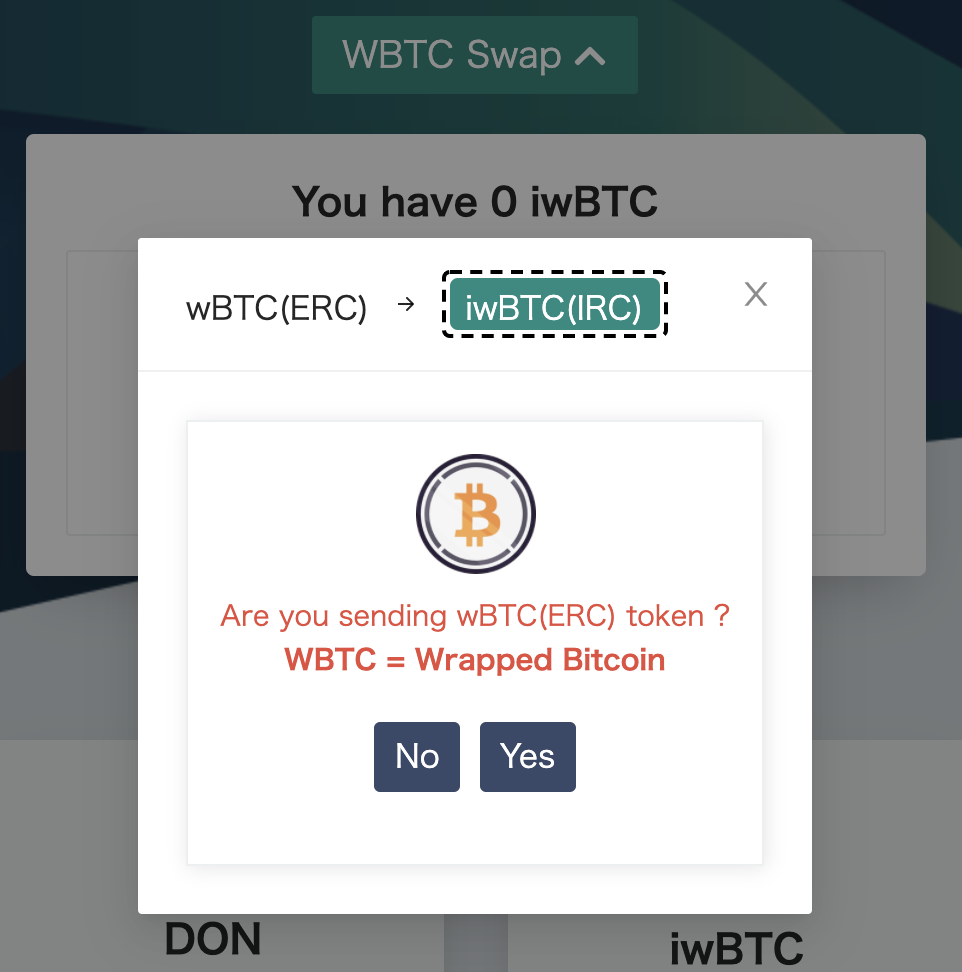
2021年3月24日 JST21:00頃に確認したところ、注意画面が設けられていた。やらかしあったのだろうな。。
暗号資産取引所、Dapp提供元、暗号資産運用会社、カストディアン等基本的に外部委託部分には常にこの手のリスクが付きまとうが、今更論うのはiwBTCの定義・ホワイトペーパー的な文書が公式サイトやメディアから確認できなかった為。
因みにERC20 WBTCはBTCと1:1 backedとなるよう運営されており、実際に1:1均衡が取れているかは自主点検だけでなくDAOメンバーによる監査対応を行っている。
DAO members will publicly audit the WBTC tokens to make sure that the balances in the custodian wallet match the balances in the smart contract.
WBTCの運営体制と比較するとリスク高と言わざる負えない。(1:1 backedか否かの記載もない。。)
また、現状ETHのGas代高騰は継続しており、DONの価格変動性も鑑みると少額投資の場合は手数料負けする点もデメリットと考える。
上述の見解は2021年3月24日時点の情報を元に記載しており、将来の状況の変化により見解が変わる可能性もある点はご留意頂きたい。
表題のエラーで嵌った為、解決法を共有するもの。
Apache httpdの公式Docker imageであるhttpd:2.4.46において、/usr/local/apache2/conf/httpd.confにカスタム設定を記述の上コンテナ起動した際に以下のエラーメッセージが出力しhttpdプロセスが起動せず。
この記事はMDCアドベントカレンダー22日目の記事となる。
表題のJetson nanoとはNVIDIA製の128-core GPU、Quod-core ARM CPUを持つシングルボードコンピュータ (ref: Wikipedia link)。
公式 Jetson nano 2GB 仕様:Jetson Nano 2GB Developer Kit | NVIDIA Developer
本記事では2020年10月5日に発売発表されたJetson nano 2GBとUSBカメラを用いてWeb動画ストリーミング機能をPython Flaskで構築するためのソースコード等を紹介するもの。
Python pandasのデータフレームの学習がてら表題のオープンデータを用いて日時の陽性者数を年代別に積み上げグラフとして出力するスクリプトを下記リンク先に掲載。